
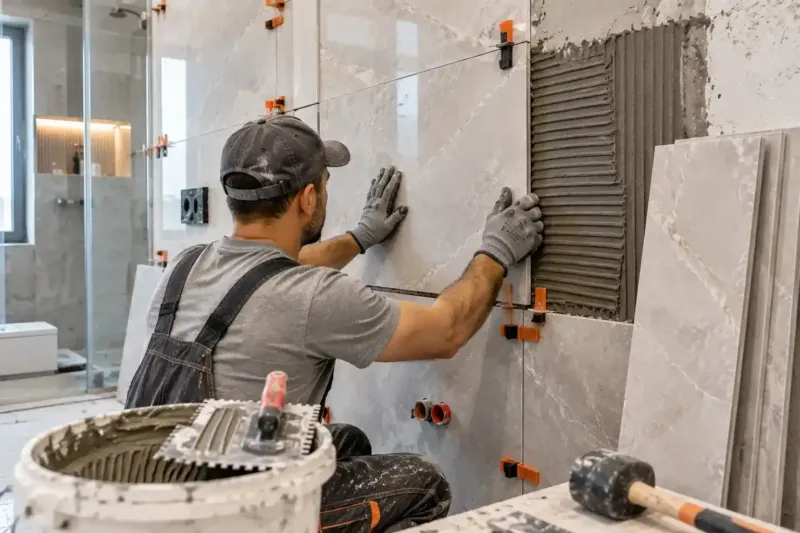
Large-format tile installation in Batumi
Large-format tile installation in Batumi starts with a site measurement: will a 120×240 slab fit in the lift, and is the base under it flat? We lay slabs from 80×160 to 120×280 cm on floors, bathroom walls and kitchen splashbacks. Labour costs from 140 ₾ per m², and the slabs, adhesive and levelling system are not included in that price. We draw up the layout and agree it with you before the slabs are ordered, so that the joints line up with the centre lines of the doors and sanitary ware and the cuts end up where they won't be noticed.
from 140 ₾/m²labour only: slabs, adhesive and levelling system extra. The final price is confirmed once agreed.
- Timeline: 3–5 days for a living room floor of about 25 m² in 120×240 slabs on a ready base; levelling the base adds a few days
- Warranty: A 2-year warranty on laying: detachment, voids, opened joints
Who it’s for
You want a kitchen-living room floor in 120×240 slabs without thresholds and don't know whether they will fit in the lift
Bathroom walls from floor to ceiling in two or three slabs, with joints that have to line up with the mixer and the niche
An apartment in a high-rise with panoramic windows, where raking light shows every lip in the floor
A kitchen splashback in a single sheet of stone-look porcelain instead of a glass panel
You live abroad and want to see the base and the back of the first slab in photos before the work continues
What’s included
- measuring the lift car, staircase and openings against the slab size
- checking the base with a straightedge, laser level and moisture meter, and levelling it if needed
- a layout showing the joints, cuts and outlets before the slabs are ordered
- checking the crates on delivery: shade, calibre, bow, chips
- lifting and carrying the slabs on a frame with vacuum suction cups
- adhesive on the base and the back of the slab, a levelling system for the edges
- cuts, cut-outs for outlets and the drain, 45° mitres on corners
- grouting, and flexible sealant in the movement joints
- protecting the laid floor until the end of the renovation
What we count as large format
By large format we mean slabs from 80×160 to 120×280 cm, most often 120×240 and 120×280, 6 mm or 9–12 mm thick. A 120×240 slab 6 mm thick weighs about 40 kg, and a 12 mm one about 80 kg.
Slabs like these leave few joints: a bathroom wall from floor to ceiling is made up of two or three sheets, and a kitchen-living room floor without thresholds looks like a single surface. In a small toilet with boxing and an installation frame, most of the slab ends up as offcuts, and a smaller format makes more sense there. It is covered on the page about laying standard-size porcelain tiles.
How a slab gets into the apartment
Large slabs are transported and carried only on edge, in the manufacturer's wooden crate or on a handling frame. If you lift one flat by its edges, it bends under its own weight and snaps.
At the site measurement we measure the service lift car and the door opening and look at the staircase: on a narrow flight with a turn, a slab on a frame can't be turned round. We stand the crates upright against a load-bearing wall, on timber battens: a crate weighs hundreds of kilograms and would push through a plasterboard partition.
The base for large-format slabs
We check the screed under a large format the same way as under 60×60 porcelain floor tiles: for strength, with a moisture meter and with a straightedge. But a two-metre straightedge is shorter than a 120×240 slab and may miss a gentle hump in the middle of the room, so we also take laser level readings on a grid at roughly one-metre intervals. In our practice the tolerance is the same, up to 2 mm over two metres, but we don't leave a wave along the length of a slab: the slab rests on the high points and is left hanging over the dip.
If the deviation is bigger, we level the floor with a thin self-levelling layer. A thick bed of adhesive won't correct the unevenness: it shrinks, and a void is left under the slab.
Large-format tile installation in Batumi: adhesive and levelling
We use C2 adhesive with extended open time, which is the letter E in its classification, and with S1 or S2 flexibility as the slab's data sheet requires. We apply it to both the base and the back of the slab with a large-notch trowel, in ridges running parallel to the short side: that way the air has a shorter path to the edge. The back of a 120×240 slab is almost three square metres, so two people spread the base and the slab at the same time, otherwise the first coat starts to skin over.
We lower the slab with a frame fitted with vacuum suction cups and go over it with a tile vibrator from the centre to the edges: it drives the adhesive under the whole area and pushes the air out to the edges.
A tile levelling system holds the edges of neighbouring slabs in one plane, and we remove the clips the next day. We leave a 2 mm joint, sometimes 1.5 mm on rectified slabs if the data sheet allows it. We never lay large formats without a joint: the slab needs a gap for thermal expansion, and by a panoramic window joint-free laying leads to chipped edges over time.
Cuts and cut-outs in a large slab
We make long cuts with a rail tile cutter or a saw on a guide rail. A cut-out inside the sheet, for example for a socket in the splashback, starts with core bit holes at its corners: from a sharp internal corner a crack easily runs right across the sheet.
A 45° mitre along the full height of the wall is cut with a saw on a guide rail in a single pass: any wobble shows along a 2.8 m edge. We allow more spare material in the layout than usual: one slab spoiled on a cut costs almost three square metres of material.
What to do before laying, and what not to do afterwards
Water outlets, splashback sockets and the boxing for the installation frame are positioned to the layout, so that they land in the centre of a slab or in a joint rather than in a narrow strip by an edge. In a shower, a large slab can only go on a fall in a single plane towards a linear drain; there is more on this on the page about the shower without a tray.
Underfloor heating under slabs like these is laid as a cable in the screed, or the mat is covered with a thin self-levelling layer; we never put it straight into the adhesive bed. Under the self-levelling layer the cable is protected from the trowel and the clips, and if a loop is damaged right under the slab, a sheet of three square metres can no longer be lifted without breaking it.
Nobody walks on the laid floor until the adhesive has gained strength, usually 24 hours, or as the data sheet specifies. We grout after removing the clips and cover the floor with cardboard straight away: against the light, every scratch from sand shows on a large slab.
What we add to sign-off for large formats
We check flatness, joints and voids against the general tiling sign-off checklist. For large formats we add things that hardly ever come up with 60×60 tiles:
- we lift the first slab with the frame straight after laying and photograph its back for the report: the adhesive covers it completely, including the strip along the edges;
- a torch laid on the floor facing the window: in the raking light there should be no lips at the joints and no wave along the long side;
- tapping across the whole area of the sheet, not just at the corners: a void in the middle of a 2.4 m slab can't be heard from the edge;
- mitres with no wobble and no chips along the full height of the wall;
- movement joints in doorways and along walls are clean, free of adhesive and filled with flexible sealant.
If we find a void, we lift the slab and lay it again: there is no reliable way to inject adhesive under a large slab.
How much large-format tile installation costs
Laying large-format porcelain tiles costs from 140 to 180 ₾ per m². That is labour only: the slabs, adhesive and levelling system are separate lines in the estimate. As a guide, the slabs themselves cost from 205 to 300 ₾ per m².
Wall tiling, cut-outs inside slabs and carrying the slabs up the stairs, if they don't fit in the lift, push the price towards the upper end. Mitre cutting at 45° on corners is a separate line, from 100 to 130 ₾ per linear metre. If the base needs levelling, a self-levelling floor adds from 14 to 18 ₾ per m². The final cost is set after the site measurement and once the estimate is agreed: a photo shows neither the lift car nor the dips in the screed.
Stages and timelines
-
Site measurement and delivery check
1 day
We measure the lift, staircase and door openings, check the base with a straightedge and moisture meter, and find out the building's rules for bringing materials up.
-
Layout and ordering the slabs
2–3 days
We draw a layout with the joints on the centre lines of the doors and sanitary ware, count the whole slabs and the spares, and agree the plan with you.
-
Levelling the floor
3–5 days
We take laser level readings on a grid, pour a thin self-levelling layer or correct the walls, and prime. A self-levelling floor needs several days to dry.
-
Carrying up and checking the slabs
1 day
We bring the crates up, open them, check the batch, calibre and bow, and stand the slabs on edge against a load-bearing wall.
-
Laying with a frame
3–5 days
We lay the slabs with adhesive on both sides, go over them with a vibrator, bring the edges into line with clips, and make the cuts, cut-outs and mitres.
-
Grouting and handover
1–2 days
We remove the clips, grout the joints, fill the movement joints with sealant, tap every slab and hand over the work with a completion certificate.
Local specifics in Batumi
Many seafront apartments in Batumi face west, and in the evening the sun is low, shining almost along the floor. Light like that shows a lip of a fraction of a millimetre between slabs and a wave along the long side of a sheet. That is why by a panoramic window we lay large formats only with a levelling system, and we sign off the floor in the evening or with a torch laid on the tiles.
If a slab doesn't fit in the lift, that leaves carrying it up the stairs on a frame or lifting it by crane through the balcony. By buildings on the narrow streets of the Old Town and by high-rises with a closed courtyard there is often nowhere to put a crane, and a crane lift needs the management company's consent. We settle how the slabs will go up with the building before they are ordered.
The cast-in-place concrete floors of new buildings keep deflecting for the first few years. This hardly matters for 60×60 tiles, but a 2.4 m sheet laid across the span can crack in the middle. That is why in large rooms we leave movement joints on the centre lines of openings and over the joints in the screed.
Materials and brands
We take large-format adhesive from the professional ranges of Mapei, Ceresit or Weber, with the primer and waterproofing under it from the same system. We check the bag against the slab's data sheet: for thin slabs, walls and underfloor heating, manufacturers often require class S2, and S1 adhesive won't do.
We match the levelling system to the slab thickness, as the clips for 6 and 12 mm are different. Slabs of 120×240 and larger aren't made by every brand or stocked by every showroom, so before drawing the layout we check that the series you want is in stock in Georgia in a single batch for the whole job. We use grout for narrow joints, with a fine filler, and fill the movement joints with colour-matched sanitary silicone.
What makes up the cost
Timeline: 3–5 days for a living room floor of about 25 m² in 120×240 slabs on a ready base; levelling the base adds a few days
- slab thickness: a thin one is easier to carry up and cut, a thick one is stronger on a floor
What raises the cost
- slabs on walls instead of the floor
- carrying the slabs up the stairs or lifting them by crane if they don't fit in the lift
- cut-outs inside a slab for the drain, sockets and outlets
- mitre cuts on niches, reveals and boxing
- levelling the base with self-levelling compound
What lowers the cost
- a flat, dry screed that needs no correction
- a rectangular room without boxing or niches
We prepare the exact estimate from measurements and photos. It’s free and comes with no obligation.
Get an estimateGuarantees
A 2-year warranty on laying: detachment, voids, opened joints. If a slab comes away or sounds hollow through our fault, we relay it at our own expense. Chips and cracks from impacts, such as a dropped frying pan or furniture being moved, are not covered. The slabs, adhesive and grout come with the manufacturer's warranty.
Questions and answers
How much does large-format tile installation in Batumi cost per m²?
Laying slabs from 80×160 to 120×280 costs from 140 to 180 ₾ per m². That is labour only: the slabs, adhesive and levelling system are priced separately. As a guide, the slabs themselves cost from 205 to 300 ₾ per m².
Wall tiling, cut-outs inside slabs and carrying the slabs up the stairs, if they don't fit in the lift, come out closer to the upper end. Send us the plan and the slab model, and you'll get a preliminary estimate within 24 hours on business days. The final cost is set after the site measurement and once the estimate is agreed, when we can see the base and the lift.
Will a 120×240 slab fit in the lift?
In an ordinary passenger lift, usually not. The slab can only travel standing on edge, in a frame, and the car has to take its length: in depth, in height or on the diagonal. Service lifts sometimes have cars like that, but by no means all of them.
Send us the width, depth and height of the car and the size of the door opening, or better still a photo with a tape measure. We'll check them against the slab before you order it. If the lift won't do, the slabs are carried up the stairs on a frame or lifted by crane through the balcony with the building's permission, or you choose the 80×160 format. The most expensive outcome is when the slabs have already been bought and only make it as far as the entrance hall.
Which thickness of large-format porcelain should you choose: 6 or 12 mm?
A 6 mm slab weighs half as much, is easier to carry upstairs and simpler to cut, so it is more often used on walls and splashbacks. It goes on floors too, but only on a base without waves and on a full bed of adhesive: over a void, a thin slab cracks from a dropped saucepan sooner than a thick one, and the manufacturer usually requires a more flexible adhesive for it.
A 12 mm slab stands up better to impact and bending. It is used on floors where heavy things are wheeled about and dishes get dropped, on steps and for worktops. We check the thickness against the series data sheet: some collections make the size you need in only one thickness.
Can a kitchen splashback be made from large-format porcelain without joints?
Yes, if the splashback is no longer than the slab. It is usually about 60 cm high, and a 120×280 sheet cuts lengthwise into two strips of almost 60 cm each, so each strip covers a splashback up to 2.8 m without a single joint. We use a 6 mm slab: a strip like that weighs about 24 kg, and two people fit it using a frame. If the splashback is longer, the one joint goes into a corner or behind the fridge.
We correct the wall for the sheet in advance: over almost three metres, any lean leaves a gap at the worktop. Sockets are marked out from the kitchen drawing, and their cut-outs are made with a core bit before fitting. The joint with the worktop is filled with colour-matched silicone, because rigid grout cracks there.
Can large-format porcelain be cut inside the apartment?
Yes, if there is enough room. A rail tile cutter for a 120×280 slab needs a table about three metres long with clear space around it, so we free up the largest room for cutting. We use the saw on a guide rail with water: there is less dust and the edge doesn't chip.
Cutting is noisy, so we do it in the daytime, which by law runs from 08:00 to 23:00, or within the building's rules if they are stricter. If the apartment is cramped, we cut in a room where the floor is already laid and covered with protection. Cut-outs for outlets and the drain are only made on site, to the actual measurements.
Further reading
Send the plan and the slab model, and we'll check the lift and price the laying within 24 hours
We reply within an hour during business hours. Message us or leave a request: we’ll call you back, go over the details and suggest the next step.
Mon–Fri 10:00–19:00, Sat 11:00–16:00